How To BuildFlying Mosquito
A tiny drone mosquito that takes off from its pad, flies around its net by itself, and radios back every time the MS-2000 laser tags its glowing white window. This guide goes from a box of parts to a working target, one step at a time.
Read this part first
- Props spin thousands of times a minute. The drone only flies with its guard on, inside the net. Hands out while the props turn.
- Takeoff only from the pad. Nobody stands over the net. A long press on GO lands it right away.
- LiPo batteries are a grown-up job. Charge on a hard surface with a grown-up nearby. Never crush, pierce, or short them.
- Unplug the battery after every session. The mosquito's radio stays on while the battery is plugged in.
- A puffy, hot, or smelly battery is done. A grown-up moves it outside on a hard surface and recycles it.
- Check the battery plug. Battery brands do not all wire the plug the same way. Match + to + before the first plug-in.
- Never look into the MS-2000 laser. The drone's own height laser is invisible and eye safe (Class 1).
- Soldering is a grown-up job. Eye protection on. The iron is hotter than an oven.
Who does what
Addie's jobs and grown-up jobs
Addie builds, tests, and codes the micro:bit. A grown-up handles batteries, soldering, the printer, and the Python code. Steps with a grown-up tag need one right there.
Addie
- Checks the parts and fills in the inventory
- Weighs every part and runs the Can it fly? experiment
- Makes the flight mat
- Snaps the guard, body and window together
- Writes the micro:bit relay in MakeCode
- Runs the test flights and keeps the journal
Grown-up
- Charges and swaps the batteries
- Runs the 3D printer and takes parts off the bed
- Solders the sensor and the battery wires
- Sets up the Pi and the Python flight script
- Flashes the drone and the XIAO
The big picture
How the Flying Mosquito works
Four computers work as a team. The drone flies. The Pi in the control box tells it where to go. The XIAO in the body feels the hits. The micro:bit tells the MS-2000.
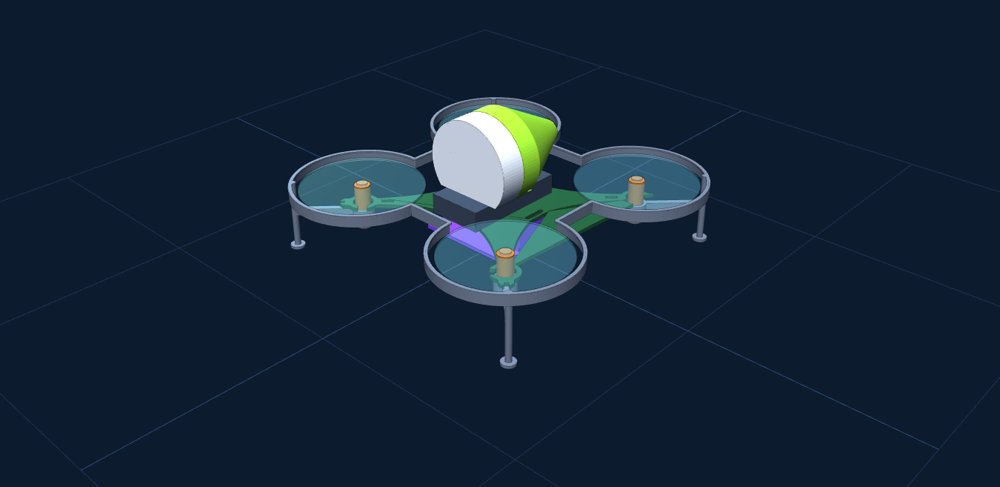
The whole drone
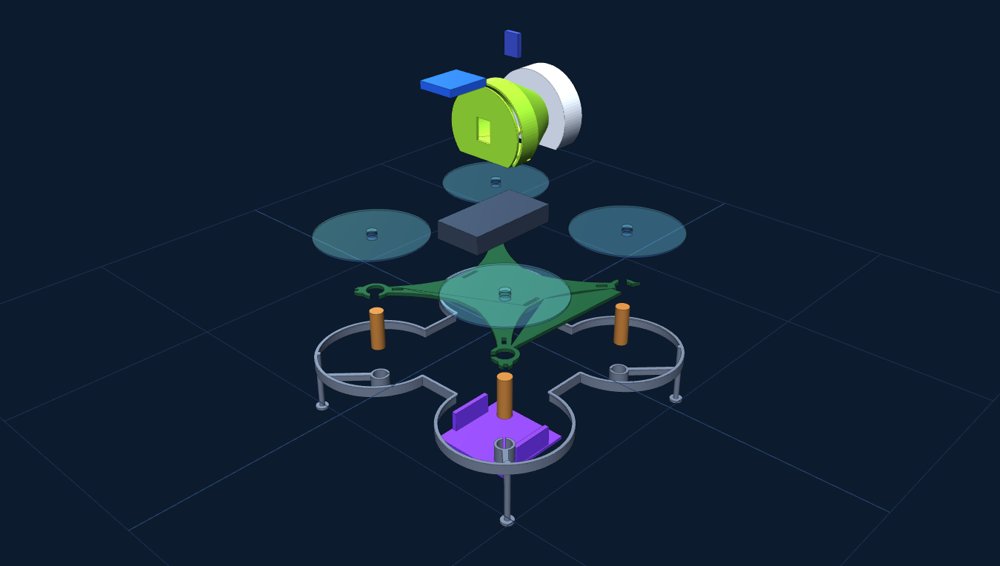
Pulled apart
Get these ready
Tools you need
| Tool | For |
|---|---|
| Digital calipers | Measuring the real parts on day one |
| Kitchen scale (1 g) and a jewelry scale (0.1 g) if you have one | Weighing every part and the push test |
| Soldering iron, solder, heat shrink, 30 AWG wire | Sensor and battery wires grown-up |
| Small Phillips screwdriver, M2 and M2.5 screws | The control box and the Pi |
| Laptop with Chrome | Flashing the drone, MakeCode, Python |
| Hot glue and CA glue | Wire strain relief, the window |
| 7 US nickels | Test weights, 5.000 g each |
| Flashlight | Testing the hit sensor |
What is in the boxes
Meet the parts
Full list with stores and prices on the Build page.
LiteWing dronex 1
A drone whose frame is its circuit board: an ESP32-S3 computer, a motion sensor, four motor drivers and WiFi. Comes with 4 motors and 55 mm props.
Its job: Flies. Makes its own WiFi network that the control box and the mosquito body join.
100 x 100 mm · about 45 g · no battery included
Positioning modulex 1
A small board that plugs in underneath: a floor camera (PMW3901) and an invisible laser range finder (VL53L1X), plus 4 colored lights.
Its job: Lets the drone hold still without anyone steering.
46 x 44 mm · 8 g · arrow points to the USB-C port
1S LiPo batteriesx 3
Single-cell lithium polymer, 3.7 V, 500 to 650 mAh, 20C or more, MX2.0 plug.
Its job: The fuel tank. One flies, one cools, one charges.
CHECK THE PLUG POLARITY before the first plug-in
XIAO ESP32-C3x 2
A thumbnail-size WiFi computer. One spare.
Its job: Lives in the body, watches the light sensor, and sends HIT over the drone WiFi.
21 x 17.8 mm · about 1.5 g
ALS-PT19 light sensorx 2
A tiny light sensor on a board with 3 pins: VIN, GND, OUT. Same sensor as the MS-2000 pod. One spare.
Its job: Feels the red laser dot glowing in the white window.
7.8 x 10.6 mm
Raspberry Pi Zero 2 Wx 1
A small Linux computer.
Its job: Runs the flight script, hears the HIT messages, and talks to the micro:bit.
65 x 30 mm · needs a 32 GB microSD card
micro:bit V2x 1
The same little computer as the MS-2000 turret and wand.
Its job: Shows the status and radios GO, HIT and STOP on group 7. Saves each run.
Plugs into the Pi by USB
24 mm arcade buttonx 1
A big button with a light inside.
Its job: Press to fly. The light means the drone is ready.
Adafruit 3430
Power bank and cablesx 1 set
Anker 321 power bank, USB cable with switch, USB-C panel port, OTG cable, micro:bit cable, jumper wires.
Its job: Powers the Pi. The switch is the main on/off; the panel port charges the bank.
Same bank as the MS-2000
Pop-up bug habitatx 1
A mesh cube about 24 x 24 x 36 inches.
Its job: The flight zone. Front rolled open toward the turret.
Holds the flight mat and the pad
Printed partsx 7 plates
Prop guard with legs, mosquito body, white hit window, launch pad, control box, box floor, fit check.
Its job: Protect the props, hold the sensor, catch the laser, start every run in the same spot.
About 5 h 45 min · about 205 g
Where every wire goes
The two wiring maps
Inside the mosquito
Inside the control box
Small parts
Where every screw goes
| Where | What | How many |
|---|---|---|
| Box floor into the corner posts | M2 x 8 | 4 |
| Pi onto its posts | M2.5 x 6 | 4 |
| GO button | its own plastic nut | 1 |
| Guard onto the motors | press fit, no screws | 4 collars |
| Body onto the battery | 10 mm hook-and-loop strap | 1 |
| Window into the body | press fit, then a drop of glue once it works | 1 |
Part A · Dec 1 to 6
Check and print
Find surprises on day one, fly the plain drone, then print the small test first.
Unbox, check, and measure
Day 1 · about 1 hour · grown-up
Same as Dusty: a wrong or missing part gets found now, not on build day. Four numbers in the 3D model are guesses until we measure.
- Check every part against the shopping list. Write what arrived and what did not.The drone and module ship from India, so they may come separately.
- Measure with calipers: how far the motor sticks out under the board, how high the props sit, the battery size, and how far the module hangs down once it is plugged in.Write all four in the journal. They go into the 3D model.
- Weigh the drone, one battery, and the module.The weight table uses 45, 16 and 8 g until now.
- Look at the battery plug and the + and - marks on the board next to it. Do they match?If not, a grown-up swaps the two pins in the plug. Never force it.
Checkpoint
Every part checked in, four measurements and three weights written down.
Journal: the date, what arrived, the numbers you measured, and anything different from the plan.
First flight with the phone app
Day 2 · 30 minutes · grown-up
Prove the drone works before anything gets changed. If it will not fly now, it is the drone, not our parts.
- Charge a battery on the drone by USB-C. The FULL light comes on when it is done.Or use the battery charger that came with the pack.
- Set the drone on a flat floor, plug in the battery, switch it on, and leave it still until the green light blinks fast.Slow green blinking means it is calibrating. Do not touch it.
- Install the LiteWing app, join the drone WiFi, and hover for 2 minutes in an open room.Low and slow. Guard is not on yet, so a grown-up flies and everyone stands back.
- Land, unplug the battery.
Why does it need to sit still at the start?
The motion sensor has to learn what "not moving" feels like. If it gets bumped while it learns, the drone thinks it is tipping and drifts.
Checkpoint
The plain drone hovers for 2 minutes.
Flash the drone and add the positioning module
Day 3 · 30 minutes · grown-up
The positioning module needs newer firmware on the drone. Firmware is the program that lives inside the drone.
- Open the LiteWing web flasher in Chrome, plug the drone in by USB-C, and flash the positioning module firmware.Battery unplugged while flashing.
- Check the drone has female headers underneath. If not, a grown-up solders four 6-pin headers on.Straight up, flush to the board.
- Plug the module in underneath, arrow pointing at the USB-C port, pressing evenly on both sides.No bent pins.
- Power up. The module's 4 lights flash once.If the drone does not start, power off and check the arrow.
Checkpoint
Module plugged in and its lights flash at startup.
Print the fit check
Day 3 · 10 minutes of printing
A 10 minute print tells us which motor collar size grips best before the 33 minute guard gets printed.
- Print plate 1, the fit check.Any color.
- Take one motor out of the drone and slide it into each collar: 1 notch is 7.0 mm, 2 notches 7.2 mm, 3 notches 7.4 mm.The right one grips firmly and does not split.
- Push the arcade button through the big hole and the light sensor into the pocket.
- Tell the grown-up the winning collar size. It goes into the guard model before plate 2 prints.
Checkpoint
Collar size picked; button and sensor fit.
Journal: which collar won and how it felt in the other two.
Print the flying parts
Days 4 to 6 · about 1 hour 10 minutes · grown-up
Three small prints: the guard, the white window, and the body. Then weigh them, because every gram counts.
- Plate 2: prop guard and legsPrints upside down, fence on the bed. Dark gray or black.About 33 minutes · about 7 g
- Plate 3: hit windowMust be WHITE PLA so the laser dot makes the face glow.About 9 minutes · about 3 g
- Plate 4: mosquito bodyStands on its front, tail up. Dark gray or black.About 26 minutes · about 5 g
- Download the .3mf plate files from the Build page and send them to the Adventurer 5M.The settings are inside: 0.2 mm layers, brim, no supports.
- Peel off the brims carefully. The guard fence is thin.
- Weigh each part and write it in the weight table.Targets: guard 6.9 g, window 2.6 g, body 5.5 g.
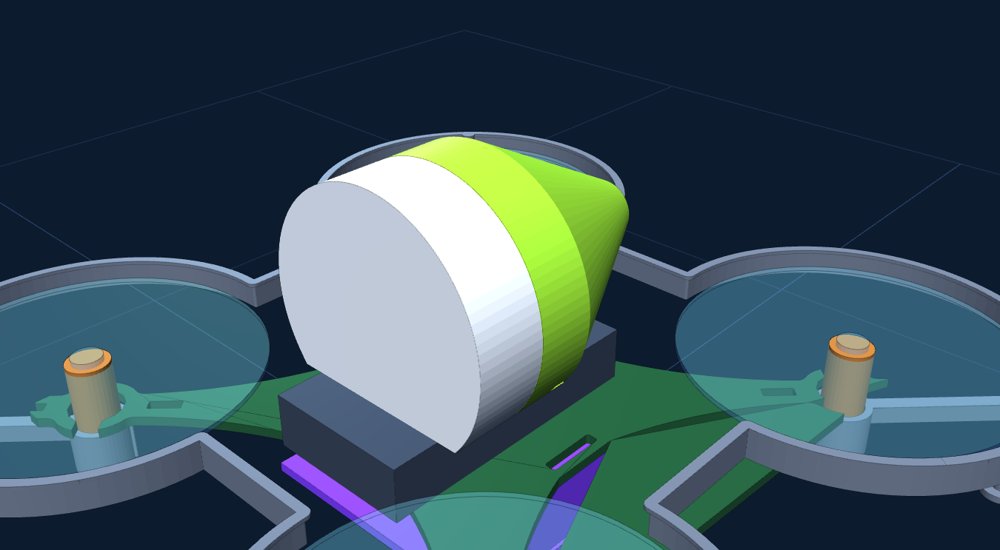
The body with the white window
Checkpoint
Three parts printed, cleaned, and weighed.
Journal: the real weights next to the targets.
Part B · Dec 7 to 13
The experiment: Can it fly?
Before building more, find out how much the drone can really carry. The answer can still change the design.
Run the Can it fly? experiment
Dec 7 to 13 · two tests, 18 flights · grown-up
Our math says the four props push about 120 g and the full drone weighs about 87 g. The experiment checks if the math is right.
- Test A, the push test: strap the drone to a heavy block on a kitchen scale, zero it, and a grown-up runs the motors at 25, 50, 75 and 100% for 3 seconds each.The scale reads below zero. That number is the push in grams.
- Test B, the hover test: hover 30 cm off the floor until the low-battery light, with 0, 2, 4, 5, 6 and 7 nickels taped to the middle. Three flights each.The laptop logs battery voltage and motor power.
- Fill in the data sheet and draw the two graphs.Minutes vs grams added, and push at each power level.
- Use the decision rules to pick: keep Rev A, go lighter, or bigger props.
Push test (Python, grown-up)
import time, cflib.crtp
from cflib.crazyflie import Crazyflie
URI = "udp://192.168.43.42"          # the LiteWing address on its own WiFi
cflib.crtp.init_drivers()
cf = Crazyflie(); cf.open_link(URI); time.sleep(1)
cf.commander.send_setpoint(0, 0, 0, 0)  # unlock
for pct in (25, 50, 75, 100):
    thrust = int(10000 + (60000 - 10000) * pct / 100)
    t0 = time.time()
    while time.time() - t0 < 3:      # keep sending, or the drone stops
        cf.commander.send_setpoint(0, 0, 0, thrust); time.sleep(0.05)
    cf.commander.send_setpoint(0, 0, 0, 0); input(f"{pct}%: read the scale, press Enter")
cf.close_link()
Drone strapped down, guard on, hands clear. LiteWing thrust runs from 10000 to 60000.
Checkpoint
18 flights done, the push measured, the decision made.
Journal: every flight time, the push numbers, the graphs, and the conclusion.
Part C · Dec 14 to 20
Teach it to fly by itself
First from the laptop, over a flight mat, in the net.
Make the flight mat and set up the net
About 1 hour
The floor camera sees movement by watching the floor slide by. A plain or shiny floor gives it nothing to see, and the drone drifts.
- Glue a printed high-contrast pattern (checkers, dots, or a newspaper page) onto poster board.Matte paper, not shiny.
- Pop up the bug habitat. Roll the front panel up and pin it open.The open side faces where the turret will sit, 3 feet away.
- Lay the mat on the habitat floor and the launch pad on top when it is printed.Until then, the drone starts on the mat.
How does a floor camera know where it is?
It takes hundreds of tiny pictures of the floor every second. When the pattern slides left in the picture, the drone is moving right, so it pushes back. That is called optical flow. A computer mouse works the same way.
Checkpoint
Net up, mat down, ready to fly.
Hover by itself from the laptop
About 2 evenings · grown-up
The laptop sends "stay at 40 cm, do not move" 10 times a second, and the drone uses its floor camera and range finder to obey.
- Install Python and the Crazyflie library (cflib) on the laptop. Join the drone WiFi.pip install cflib
- Guard on, battery in, drone on the mat, facing the open side of the net.
- Run the hover script: take off to 40 cm, hold 20 seconds, land.Measure how far it drifts with a ruler taped to the mat.
- Then run the pattern script: a slow square and a figure eight at 0.2 m per second.If it drifts out of the zone, the script lands it.
Hover and pattern (Python, grown-up)
import time, cflib.crtp
from cflib.crazyflie import Crazyflie
from cflib.crazyflie.syncCrazyflie import SyncCrazyflie
URI, HEIGHT, SPEED = "udp://192.168.43.42", 0.4, 0.2   # meters, meters per second
cflib.crtp.init_drivers()

def hold(cf, vx, vy, z, seconds):
    for _ in range(int(seconds * 10)):           # 10 times a second
        cf.commander.send_hover_setpoint(vx, vy, 0, z)   # yaw rate 0: window keeps facing the turret
        time.sleep(0.1)

with SyncCrazyflie(URI, cf=Crazyflie()) as scf:
    cf = scf.cf
    cf.commander.send_setpoint(0, 0, 0, 0)       # unlock
    for i in range(1, 21):                       # climb over 2 seconds
        hold(cf, 0, 0, HEIGHT * i / 20, 0.1)
    for vx, vy in [(SPEED, 0), (0, SPEED), (-SPEED, 0), (0, -SPEED)] * 3:
        hold(cf, vx, vy, HEIGHT, 2)               # 40 cm each side
    for i in range(20, 0, -1):                   # come down slowly
        hold(cf, 0, 0, HEIGHT * i / 20, 0.1)
    cf.commander.send_stop_setpoint()
Based on LiteWing's own position hold examples. The final version lives on the Pi (step 16).
Checkpoint
It takes off, flies the square inside the zone, and lands, 3 times in a row.
Journal: how far it drifted each time.
Part D · Dec 21 to Jan 3
The hit sensor
The light sensor feels the laser, and the XIAO tells the control box.
Wire the sensor and the XIAO
About 1 hour · grown-up
Three short wires from the sensor, two from the battery. Everything stays inside the body.
- Solder 3 thin wires to the light sensor: VIN, GND, OUT. Heat shrink each joint.About 6 cm long.
- Solder VIN to the XIAO 3V3 pin, GND to GND, OUT to A0 (also marked D0).See the wiring map.
- Solder two wires to the BAT+ and BAT- pads under the XIAO, and the other ends to the + and - pins on the back of the drone's battery plug.Red to +. Check twice before any battery goes in.
- Press the sensor into the pocket on the body's front wall, face out. XIAO flat on the floor, USB-C toward the tail slot.A dot of hot glue on each wire where it leaves the board.
Checkpoint
Nothing shorted: with the battery in, the XIAO light comes on and nothing gets warm.
Code the XIAO: feel the hit
About 1 evening · grown-up
The XIAO learns how bright the room is, then shouts HIT when the light jumps. It waits 1 second before it can shout again, like the MS-2000.
Hit sensor (Arduino on the XIAO, grown-up)
#include <WiFi.h>
#include <WiFiUdp.h>
const char* SSID = "LiteWing_xxxx";   // the drone WiFi name
const char* PASS = "........";        // and password, from the LiteWing guide
const int JUMP = 150;                 // how big a jump counts as a hit: set in the flashlight test
WiFiUDP udp; long base = 0; unsigned long lastHit = 0;

void setup() {
  WiFi.begin(SSID, PASS);
  while (WiFi.status() != WL_CONNECTED) delay(200);
  for (int i = 0; i < 200; i++) { base += analogRead(A0); delay(5); }
  base /= 200;                        // normal room light
}

void loop() {
  int v = analogRead(A0);
  if (v > base + JUMP && millis() - lastHit > 1000) {
    udp.beginPacket(IPAddress(192, 168, 43, 255), 5005);   // shout to everyone on the drone WiFi
    udp.print("HIT"); udp.endPacket();
    lastHit = millis();
  } else if (v < base + JUMP / 2) {
    base = (base * 31 + v) / 32;      // slowly follow the room light
  }
  delay(5);                           // 200 checks a second
}
Upload with the Arduino IDE (board: XIAO_ESP32C3). The laptop can listen on port 5005 to see the HITs.
- Flashlight test: flick a flashlight across the white window. The laptop shows HIT.
- Now the real laser (grown-up turns it on): point the MS-2000 laser at the window. HIT every time.If it misses, make JUMP smaller. If it shouts HIT with no laser, make JUMP bigger.
Checkpoint
10 laser flicks, 10 HITs, and no HIT when nothing happens for a minute.
Journal: the JUMP number you picked and why.
Put the mosquito together
30 minutes
Guard, body, window, wings. Then weigh the whole thing.
- Push the guard collars up onto the motor cans from below, slits facing the middle so the motor wires pass.Feet point down.
- Thread the battery strap through the tunnel in the body floor, set the body on the battery, strap it all to the drone.The white window points forward.
- Plug the white window into the front of the body. Glue it only after step 10 works.
- Cut two small wings from clear report-cover plastic and glue them on top of the body.Tiny and light, so they do not catch the prop wind.
- Weigh the whole drone with the battery.Target: about 87 g.
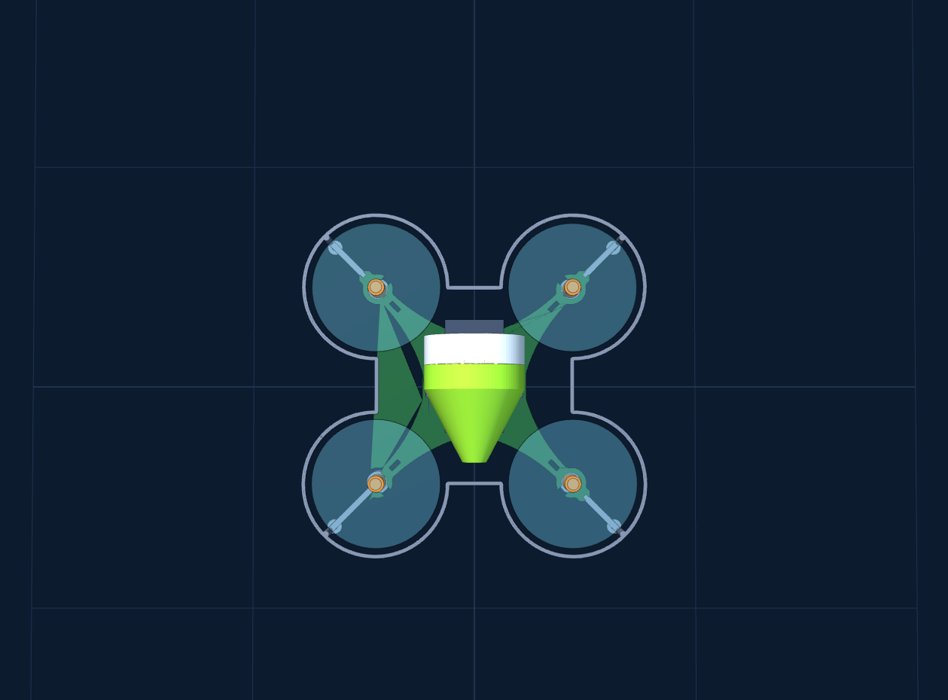
From above: guard around all four props, body in the middle
Checkpoint
It all fits, nothing touches a prop, and the weight is written down.
Part E · Dec 26 to Jan 3
The control box
The big GO button, the Pi that flies the drone, and the micro:bit that talks to the turret.
Print the pad and the box
About 4 hours 25 minutes of printing · grown-up
Three bigger prints. Good for overnight.
- Plate 5: launch padFour cone cups catch the guard feet. The arrow points at the turret.About 1 hour 16 minutes · about 56 g
- Plate 6: control boxPrints top down.About 2 hours 16 minutes · about 90 g
- Plate 7: box floorPi posts and the power bank cradle.About 54 minutes · about 40 g
Checkpoint
Three parts printed; the drone sits in the pad cups.
Set up the Pi
About 1 evening · grown-up
The Pi is a small Linux computer. It joins the drone WiFi like a phone would, and runs the flight script by itself when it turns on.
- Use Raspberry Pi Imager to put Raspberry Pi OS Lite on the microSD card. In the settings, type in the drone WiFi name and password, and turn on SSH.
- Boot the Pi, log in from the laptop, and install the library: pip install cflib pyserial gpiozero.
- Copy the flight script (step 16) to the Pi and set it to start at power-on.A small systemd service called flymo.
- Screw the Pi onto its four posts on the box floor.M2.5 x 6.
Checkpoint
Power on the Pi with the drone on: the Pi joins the drone WiFi by itself.
Wire the box
About 1 hour · grown-up
Follow the control box wiring map.
- Power bank into its cradle, ports toward the right wall. USB-C panel port through the right wall, its cable into the bank.
- Bank USB-A into the switch cable, switch cable into the Pi PWR port. Clip the switch into the left wall slot.
- OTG cable into the Pi USB port, micro:bit cable into it, micro:bit snapped face up under the top window.
- GO button into the round hole. Jumper wires: switch to GPIO 17 and GND, light to GPIO 27 and GND.Pins 11, 9 and 13.
- Screw the floor on: 4 x M2 x 8.
Checkpoint
Switch on: the Pi boots and the micro:bit lights up.
Code the micro:bit relay
Addie · about 1 hour in MakeCode
Whatever the Pi sends over USB, the micro:bit radios on group 7, the same words the MS-2000 wand uses. It also counts hits and saves each run.
Program: relay
MakeCode for micro:bit. Add the Datalogger extension.
Checkpoint
GO, HIT and STOP from the laptop show up on the micro:bit and on the MS-2000.
Journal: a screenshot of your code.
The flight script: press GO
About 1 evening · grown-up
One script on the Pi ties it all together. It waits for the button, flies the run, passes every HIT to the micro:bit, and lands.
flymo.py on the Pi (grown-up)
import socket, time, serial, threading
from gpiozero import Button, LED
# ... hold() and the pattern from step 8 ...
button, light = Button(17, hold_time=1.5), LED(27)
mb = serial.Serial("/dev/ttyACM0", 115200)          # the micro:bit
say = lambda word: mb.write((word + "\n").encode())
hits = socket.socket(socket.AF_INET, socket.SOCK_DGRAM); hits.bind(("", 5005))

def listen():                                        # HIT from the XIAO -> micro:bit
    while True:
        data, _ = hits.recvfrom(16)
        if data == b"HIT": say("HIT")
threading.Thread(target=listen, daemon=True).start()

while True:
    light.on(); button.wait_for_press(); light.off()
    if battery_volts() < 3.8: light.blink(); continue   # too low to fly a full run
    say("GO"); fly_run(seconds=30); say("STOP")         # button.when_held lands right away
The full file lives in the repo with the other tools.
- Drone on the pad, battery in, box switched on, wait for the GO light.
- Press GO. It takes off, flies the pattern for 30 seconds, and lands on the pad.
- Hold GO for 1.5 seconds during a flight: it lands right away.Practice this before anything else.
Checkpoint
Press GO, full run, lands in the cups. The emergency landing works.
Part F · Jan 4 to 24
Test it
Twenty flights on its own, then the MS-2000 gets its turn. Only on days with no MS-2000 experiment.
Twenty flights in a row
Jan 4 to 15 · about 3 evenings
An engineer does not trust one good flight. Twenty in a row shows if it really works.
- Fly 20 runs. For each one, write: landed on the pad? crashed? how many flashlight hits sent and received?Swap batteries between runs.
- Anything that fails twice gets a fix and a line in the history log.If the fix changes a part, it needs a change order.
Checkpoint
18 of 20 runs land on the pad, and every flashlight hit reaches the micro:bit.
Journal: the 20 results in a table.
MS-2000 vs the Flying Mosquito
Jan 16 to 24 · after the MS-2000 experiments are done
The fun part. Can the turret hit something that flies by itself?
- Teach the MS-2000 camera the flyer: Object Tracking, learn it hovering in the net.This replaces the stuffed mosquito it learned.
- Turret 3 feet from the net, laser armed by a grown-up. Run 10 flights of 30 seconds.The box micro:bit sends GO, so the turret starts its run.
- Count hits and the time to the first hit, the same numbers as the MS-2000 experiment.
- Teach the camera the stuffed mosquito again when you are done.The fair demo uses the stuffed mosquito.
Checkpoint
10 runs recorded, and the stuffed mosquito learned again.
Journal: hits per run and time to first hit, next to the MS-2000 results.
When it misbehaves
Fixing it
Find what you see, try the fix. Write every problem in the journal.
| What you see | Most likely cause | What to do |
|---|---|---|
| Drone will not connect | Wrong WiFi | Join the drone WiFi, turn off mobile data and VPN, restart the app. |
| Slow green blinking forever | Still calibrating | Put it on a flat floor and do not touch it. Power cycle. |
| Flips on takeoff | Prop on the wrong motor | Check each prop matches the spin mark on the board. |
| Drifts in one direction | Floor camera cannot see | Use the flight mat. More contrast, matte paper, better light. |
| Climbs slowly, lands itself early | Too heavy or battery tired | Weigh it. Fresh battery. See the Can it fly? decision rules. |
| Wobbles, then drops | Battery voltage sag | Battery rated under 20C, or worn out. Swap it. |
| HIT with no laser | JUMP too small, or room lights flicker | Make JUMP bigger. Try away from bright lamps. |
| Laser hits but no HIT | JUMP too big, or XIAO not on WiFi | Make JUMP smaller. Check the XIAO joins the drone WiFi. |
| micro:bit shows nothing | USB cable | Some micro-USB cables only charge. Use a data cable through the OTG cable. |
| Turret ignores the runs | Radio group | Both programs say radio set group 7? |
| Guard rubs a prop | Collar not all the way up | Push the collar up until it stops. Check the slit faces the middle. |
Words to know
Say these like a scientist
Everything else