How To BuildMS-2000
A laser turret that learns what a mosquito looks like, follows it, and tags it with a safe laser. The mosquito flashes its eyes on every hit, and the wand saves every run as data. This guide goes from a box of parts to a working turret, one step at a time.
Read this part first
- Never look into the laser. Not even a weak one. Point it only at the backdrop and the mosquito.
- The arm switch stays off until a grown-up turns it on. No arm switch, no laser, no matter what the code says.
- The beam runs sideways along the table, never toward people. The printed tilt stop keeps the head from aiming up.
- Only the Class 2 laser on the parts list. Its maker label stays showing. Never swap in a laser pointer.
- Soldering is a grown-up job. The iron is hotter than an oven. Wear eye protection.
- The laser's metal case carries power. Only plastic touches it. No metal clips or screws against the case.
- Fingers away from the servos while the turret is on. The clutch servos slip instead of pinching hard, but they still move fast.
- Side switch off and bank cable unplugged before any wiring change. Side switch off when you are done for the day.
- The power bank is a sealed lithium battery. Never crush, pierce, or drop it. If it gets hot, swells, or smells, a grown-up takes it out and puts it somewhere safe.
Who does what
Addie's jobs and grown-up jobs
Addie builds and codes. A grown-up handles the hot, sharp, and laser parts. Steps with a grown-up tag need one right there.
Addie
- Checks the parts and sorts the screws
- Builds the wand, the base, and the head
- Teaches the camera the mosquito
- Writes all the code in MakeCode
- Designs the pew, boom, beep, and splat sounds
- Runs every test and keeps the journal
Grown-up
- Runs the 3D printer and takes parts off the bed
- Solders the sensor, the eyes, and the laser wires
- Turns the arm switch on and off
- Checks the laser lines up before it is ever switched on near people
- Helps with the tricky code
The big picture
How the MS-2000 works
Two micro:bits work as a team. The one in the turret sees, aims, and fires. The one in the wand feels the hit and keeps score. They talk by radio.
All seven steps happen in less than a second.
Why two micro:bits?
The turret can not see the laser dot land. It only knows where it aimed. To prove a real hit, something has to be inside the target and feel the light. That is the wand's job. Having one machine shoot and a different machine check the score is how real tests stay honest.
Before you start
Tools you need
Know your gear
Meet the parts
Lay everything out on a towel before you build. Find each item below so you know what you are holding. Every bought part is also in 3D, with its size.
micro:bit V2 ×2
A tiny computer with 25 lights, two buttons, a touch logo, a speaker, a microphone, a light sensor, and a radio built in. The five big gold rings are where wires connect.
Its job: one is the turret's brain. The other lives in the wand, feels hits, and saves the data.
51.6 × 42 mm · must be V2 (has the gold logo)
Xia mi board
A helper board the micro:bit plugs into. It adds 5 volt pins for servos, a special plug for the camera, a relay, and a jack for the power cable.
Its job: the turret's power station and switchboard. Its relay is the switch that fires the laser.
57 × 87 mm · power switch stays ON
HuskyLens AI camera
A camera with a tiny AI chip. Show it an object, hold the learn button, and it remembers it. Its screen draws a box around the object and it tells the micro:bit where the box is.
Its job: the turret's eyes. It finds the mosquito 30 times a second or so.
52 × 36 mm · 2 × M3 screws · own cable included
Clutch servo ×3
A small motor that turns to an exact angle, from 0 to 180 degrees, and holds it. The white arm is the horn. A clutch inside slips if a hand grabs it, so the gears do not break.
Its job: one turns the head left and right (pan), one tips it up and down (tilt). The third is a spare.
23 × 12 mm body · 3-pin plug
Class 2 laser
A red laser, less than one thousandth of a watt, in a metal tube as thin as a pencil. The label says Class 2: safe enough that your blink protects you, but still never look into it.
Its job: it rides under the camera and flashes for a quarter of a second when the mosquito is centered.
7 mm × 21 mm · 650 nm red · plastic holder only
Arm switch
A slide switch smaller than a fingernail. The middle leg connects to one side or the other, depending on where the lever sits.
Its job: the laser safety. It sits in the back wall. When it is off, the laser has no power at all.
About 9 × 4 mm · hot glued in its frame
Light sensor ×3
A tiny sensor that lets more electricity through when more light hits it. The micro:bit reads it as a number from 0 (dark) to 1023 (very bright).
Its job: it hides inside the mosquito pod and feels the laser dot. Two are spares.
7.8 × 10.6 mm · VIN, GND, OUT
Red LEDs and resistors ×10 each
An LED is a light that only works one way round: long leg to plus. A resistor slows electricity down so the LED does not burn out.
Their job: two LEDs are the mosquito's eyes. Each gets its own 220 ohm resistor.
5 mm LEDs · push in from the back of the pod
Speaker module
A speaker with its own amplifier, which makes quiet signals loud, and a volume knob.
Its job: the pew, the boom, the lock-on beep, and the victory song. It faces the grille in the back of the base.
40 × 40 mm · 4 × M2 · Gravity cable
Power bank and battery holders
The power bank is a rechargeable battery, like the one that charges a phone. It has a USB-A port that gives power and a USB-C port that charges it. The small holders take two AAA batteries and have the white plug a micro:bit takes.
Their job: the bank powers the turret and stays inside the base. You charge it through a USB-C port on the side. A small pack powers the wand.
Bank 97 × 46 × 22 mm, 5 V · 2×AAA zip-tied
Ribbon cable
Four thin wires stuck side by side, soft and bendy. It rides down the fishing line to the mosquito, held on by the little printed clips.
Its job: carries power to the sensor and eyes, and brings the sensor signal back to the wand.
4 wires: 3V, GND, sensor, eyes · write down your colors
Screws and cables
A kit of tiny M2 screws and nuts (M2 means 2 millimeters thick), plus short cables with plugs on both ends.
Their job: the screws hold the printed parts together. The cables connect the speaker.
M3 screws for the camera come in its own box
Mosquito and backdrop
A store-bought stuffed mosquito, black foam board, a 1/4 inch dowel, fishing line, and a rod. The white pod gets sewn onto the mosquito.
Their job: the target, and a plain black wall behind it so the camera can see it and the laser has somewhere safe to land.
Foam board 5 mm thick · 30 × 20 in
Printed parts 12 pieces
Base shell and floor, turntable and yoke, pivot pin, camera head, wand, the white pod cup and its cap, pendulum pivot, backdrop clip, two feet, and cable clips.
Their job: every electronic part lives inside something printed. Step 2 shows the print order.
About 335 g of PLA · 11 g must be white
Where every wire goes
The two wiring maps
Keep this page open while you wire. Side switch off and bank cable unplugged before you change any wire.
Turret
The laser only gets power when the arm switch is on AND the relay clicks. The side switch turns the whole turret on and off.
Mosquito and wand
Long LED leg toward the resistor. Short leg to ground. Both eyes get their own resistor.
What is a circuit?
Electricity only flows around a complete loop: out of the battery, through the part, and back. Every part here has two paths: power in and ground back. Break the loop anywhere and nothing happens. That is exactly how the arm switch works: it breaks the laser's loop.
Hardware
Where every screw goes
Sort the screws into a muffin tin before you start, one cup per row. Pick lengths from the M2 kit when the parts arrive; the two marked lengths matter.
| Where | Screw | How many | Notes |
|---|---|---|---|
| Xia mi board to floor plate | M2 | 4 | Into the four posts; the plastic makes its own thread |
| Floor plate to base shell | M2 | 4 | Up from underneath into the corner posts |
| Pan servo to deck | M2 + nut | 2 | Down through the deck and the servo ears, nut underneath |
| Speaker to back wall | M2 | 4 | Into the four round bosses |
| Tilt servo to yoke | M2 | 2 | From the outside of the right upright |
| Servo horns | horn screw | 2 | Come in the servo bags |
| Pivot pin to head | M2 × 12 + nut | 1 | Nut drops into the trap inside the left side of the head |
| Laser clamp | M2 × 10 | 1 | From below. It squeezes plastic, never the laser |
| HuskyLens to head | M3 + nut | 2 | From the camera's own kit; nuts go in the back traps |
| Wand micro:bit rings | M2 | 4 | Through 3V, GND, P0, P1; each one clamps a wire |
| Total | 26 | 22 × M2 (3 of them with nuts), 2 × M3 with nuts, 2 horn screws. Plus 3 zip ties for the wand. |
Part A
Check and print
Measure what arrived, fix the print files if anything is off, then print in five batches. Each batch unlocks the next build steps.
Unbox and measure
The weekend the parts arrive · about 1 hour
The print files were drawn from datasheets and photos before anything arrived. A part that is 1 mm different can stop a screw from lining up. Ten minutes with calipers now saves a 3 hour reprint.
- Check every item against the shopping list. Tick them off on the parts list PDF.Keep the tiny parts (sensors, LEDs, resistors, switch) in a labeled bag.
- Measure the Xia mi board: the distance between its corner holes, both ways.The base expects about 80.2 mm by 50.2 mm between hole centers.
- Measure a servo, the 2×AAA pack, the arm switch, the power bank, the in-line switch, the charge port, and the stuffed mosquito. Write every number in the journal.The bank, the in-line switch, and the charge port all fit holes or a cradle in the base, so measure them before the base prints.
- Charge the power bank. Plug a USB-C phone charger into its USB-C port. It takes about 2 to 2.5 hours.
- Read the Xia mi board for a version number (V1 or V2). You need it for the relay block in Step 11.
- Plug a micro:bit into the Xia mi. Plug the 90° adapter and the barrel cable into the bank's USB-A port, the cable into the in-line switch, and the switch into the DC jack. Switch on. Does the micro:bit light up by itself?If it does, the board powers the micro:bit and the spare 2×AAA pack is not needed.
- grown-up Voltage check: with both servos sweeping and the laser on, the Xia mi 5V pins must read at least 4.6 V on a meter.The bank gives 5 V, the lowest the DC jack takes. If it reads low, plug into the board's own USB 5 V input instead, with a USB cable that has an in-line switch.
- A grown-up compares your numbers with the print files and fixes anything that is off before printing.
What are calipers, and what is tolerance?
Calipers are a ruler with jaws. Close them on a part and read the size to a tenth of a millimeter.
No two parts are exactly the same size. The small wiggle room between "the size it should be" and "the size it really is" is called tolerance. Printed holes are drawn 0.3 mm bigger on each side so parts slide in even when things are a little off.
You are done when
Every part is checked off, the numbers are in the journal, and a grown-up says the print files match.
Journal: the date, what arrived, the numbers you measured, and anything that was different from the plan.
Print in five batches
Starts the same weekend · about 10 hours 45 minutes of printing · grown-up
The small, quick batch goes first as a test. Then the parts for the mosquito and wand, so building can start while the big base prints. Each batch has something to learn while it prints on the print plan page.
- Batch 1: the white pod and cable clipsThe front of the sensor pod and 11 clips. Must be WHITE PLA.About 35 minutes · 11 g · unlocks step 3
- Batch 2: turret head, turntable, and wandTurntable with the tilt yoke, camera head, pivot pin, wand handle, and the back of the pod.About 3.5 hours · 77 g · unlocks steps 3, 4, and 8
- Batch 3: base shellThe biggest part. It prints upside down, deck on the bed.About 3 hours 15 minutes · 131 g · unlocks step 6
- Batch 4: floor plate and one backdrop footThe board and power bank sit on the floor plate.About 1 hour 55 minutes · 72 g · unlocks step 6
- Batch 5: pendulum pivot, backdrop clip, second footThe test rig. The pivot has the 10, 20, and 30 degree marks.About 1.5 hours · 44 g · unlocks step 14
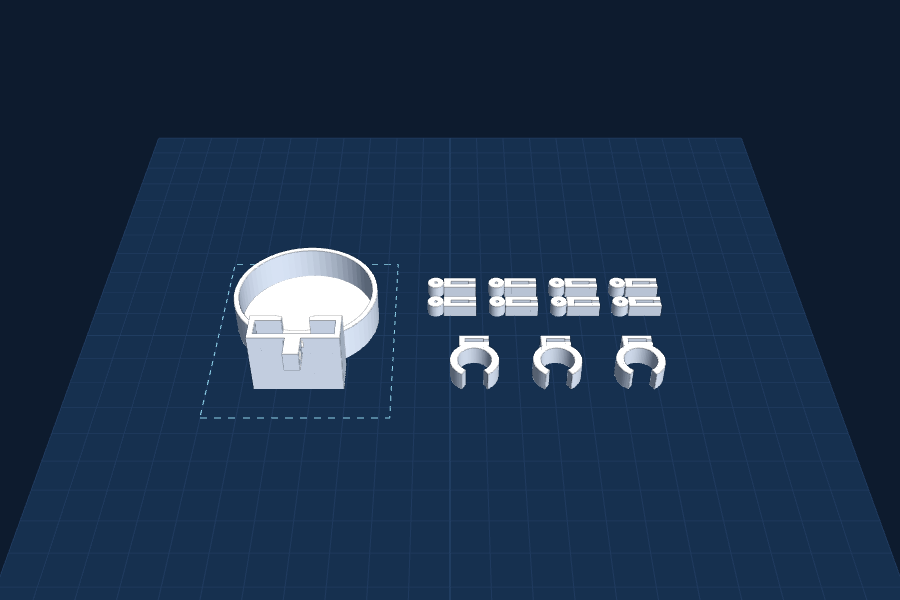
Batch 1 · white
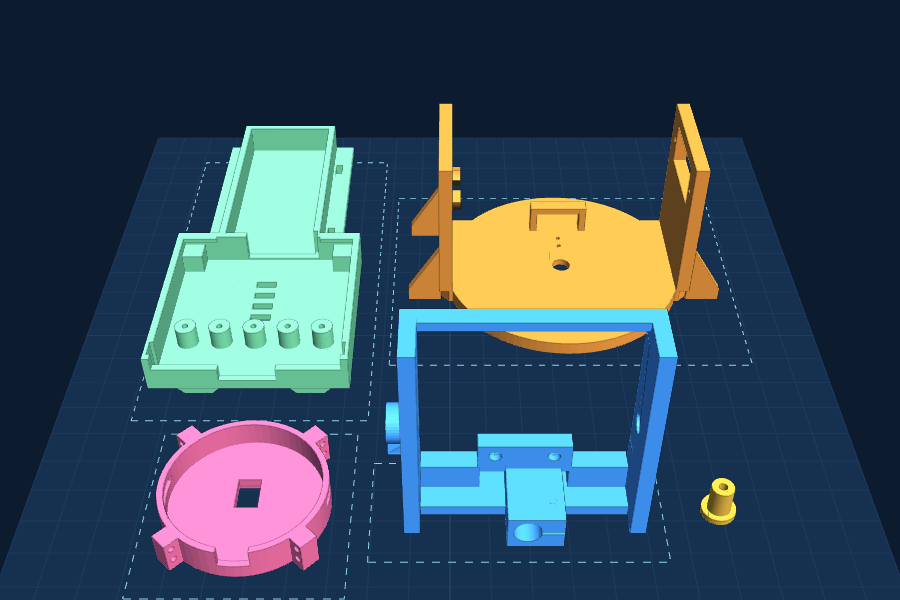
Batch 2 · the moving parts
- Open the batch's .3mf plate file in Orca-Flashforge and send it to the Adventurer 5M.The settings are already inside: 0.2 mm layers, 3 walls, 15% gyroid infill, brims, no supports.
- Wait for the bed to cool before a grown-up takes the parts off.
- Peel off the brims. Run a screw into each small hole once to clear it.
- Do the checks on the print plan page before starting the next batch.
Why is the inside of a print not solid?
Solid plastic would take hours longer and waste filament. So the printer draws a strong outer skin (the walls) and fills the inside with a wavy pattern called gyroid infill, only 15% full. It works like the honeycomb inside a beehive: light, but strong in every direction.
The base is heavier because it is so big, and that is good. A heavy base does not tip when the head swings fast.
You are done when
All five batches are printed and cleaned up: 13 big pieces (two of them are backdrop feet) and 11 little clips.
Part B
The mosquito and the wand
Build the target first. Once a flashlight can make the mosquito's eyes flash, you know the hardest part of the proof works, before the turret even exists.
Wire the mosquito pod
Batches 1 and 2 done · about 1.5 hours · grown-up solders
The pod is the mosquito's hidden heart: a white cup that glows when the laser hits, a light sensor inside, and two red eyes on top.
The dot can land anywhere on the 40 mm face and still count.
- Pick a job for each ribbon wire and write it in the journal: 3V power, ground, sensor signal, eyes.Red for 3V and black for ground are good habits.
- Push the two red LEDs into the eye holes from the back of the eye bar. Long legs on the same side.
- Solder grown-up the light sensor: 3V wire to VIN, ground wire to GND, signal wire to OUT.
- Solder the eyes: each long leg to its own 220 ohm resistor, both resistor ends to the eyes wire, both short legs to the ground wire.Tape or a dab of hot glue over each joint so no bare metal can touch.
- Seat the sensor in the cap's pocket, face out, with the wires and resistors in the open back.
- Glue the cap into the white cup. Thread the ribbon through the entry on the eye bar.
- Tie the fishing line through the tab on top. Double knot.
- Sew the pod onto the mosquito's back through the four lug holes. Wait to do this until Step 5 works.
Why a white cup instead of just the sensor?
The light sensor is smaller than a fingernail. The laser dot is about the size of a pea, and it does not always land dead center. At 2 feet and 4 feet it lands about 13 mm off from where the camera aims.
So the sensor hides behind a light collector. White plastic scatters light, so a dot anywhere on the face makes the whole cup glow, and the sensor sees the glow. The eyes sit outside the cup so their own light never fools the sensor.
You are done when
The pod is closed up, four labeled wires come out of it, and no bare metal shows.
Build the wand
Same weekend · about 45 minutes
The wand is a handle for the second micro:bit and its batteries. It clips onto the rod for the hand-held demo, and sits by the pendulum pivot for experiments. No soldering here: screws clamp the wires.
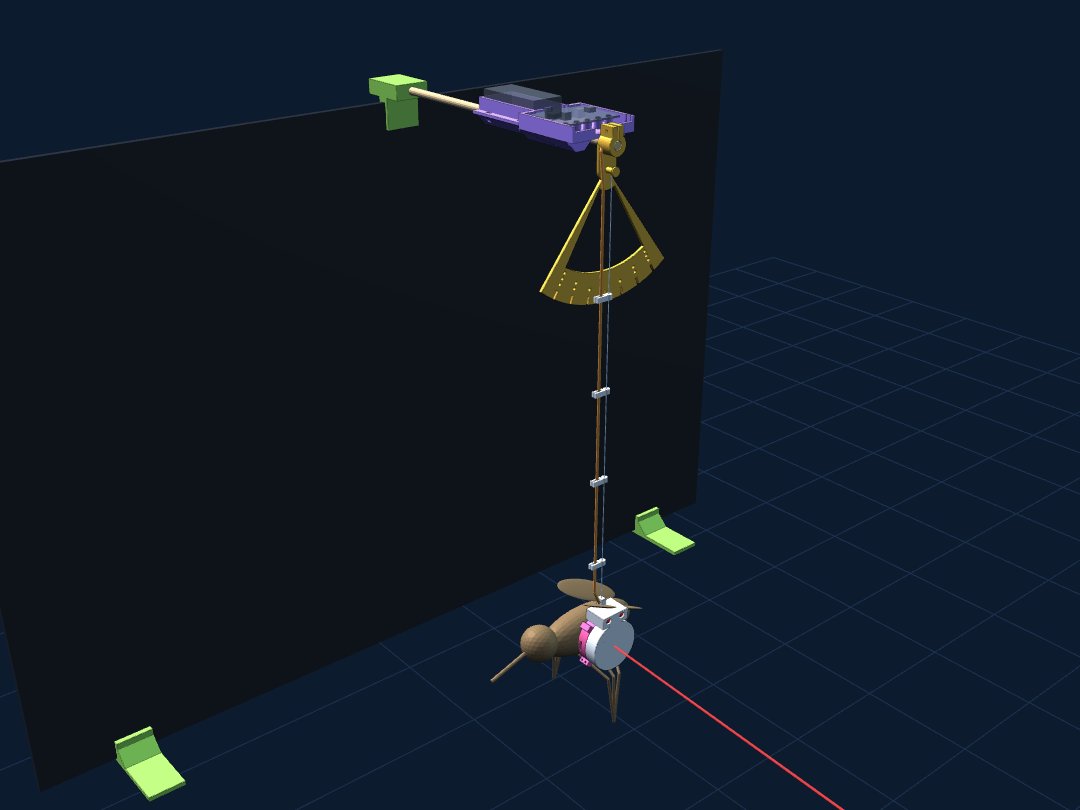
Purple wand at the top, ribbon riding the line down to the pod.
- Lay the wand micro:bit face up in its bay, gold rings toward the line end. Slide the top edge under the two corner lips.
- Strip about 8 mm off the end of each ribbon wire and twist the strands tight.
- Clamp each wire: wrap it clockwise around an M2 screw, then drive the screw down through its ring into the boss. 3V wire to 3V, ground to GND, signal to P0, eyes to P1.Clockwise, so tightening the screw pulls the wire in instead of pushing it out.
- Put the 2×AAA pack in its bay and push its plug into the white socket on the micro:bit.
- Zip-tie the wand to the rod: one tie at the front, two over the battery pack. The V-shaped rails center the rod.
- Slide a line clip onto the fishing line every 10 cm and snap the ribbon into each one. Rod clips hold it along the rod.
You are done when
With the pack plugged in, the micro:bit lights up, and gently tugging each wire does not pull it out.
Code the wand: prove a hit
The next weekend · about 1.5 hours
The first real test of the whole project. By the end, a flashlight flick on the pod makes the eyes flash, plays a splat, and sends "HIT" by radio. A laser dot will do the same thing later.
A hit is the number jumping above the line. It has to drop back below before the next hit can count.
- Go to makecode.microbit.org and start a new project called wand.
- Load Program 1 and watch the number scroll. Write down the number in room light.
- Shine the flashlight on the white face from about 1 meter. Write down that number too.The two numbers should be far apart. If they are close, check the sensor wires.
- Load Program 2. It measures the room when it starts and sets its own threshold.
- Flick the flashlight across the pod 20 times. Count the flashes.
- If it misses flicks, make the + 100 smaller. If it counts hits with no flashlight, make it bigger.
Program 1: light reader
The micro:bit reads the sensor on P0 and shows the number.
Program 2: hit detector
Calibrates, then flashes, splats, and radios on every hit.
Analog read pin and digital write pin are in Advanced > Pins. Until the splat sound exists, use "play tone Middle C for 1/8 beat".
What is a threshold, and why does the wand pick its own?
A threshold is a line you draw in a measurement: above it means hit, below it means no hit.
Room light is different on a sunny afternoon than at night, and the tests happen on different days. If the line were stuck at one number, the wand could count hits in a bright room that never happened, or miss real ones in a dim one. So the wand measures the room when it starts and puts the line just above that. Measuring your surroundings instead of guessing is called calibration. Judges love that word.
You are done when
Twenty flashlight flicks give twenty flashes, with no extra hits when the flashlight is off. Now sew the pod onto the mosquito.
Journal: the room number, the flashlight number, your threshold gap, and how many of the 20 flicks counted.
Part C
The turret
Base first, then the pan and tilt head on top, then the wires. The picture below is the whole turret pulled apart, so you can see how the pieces stack.
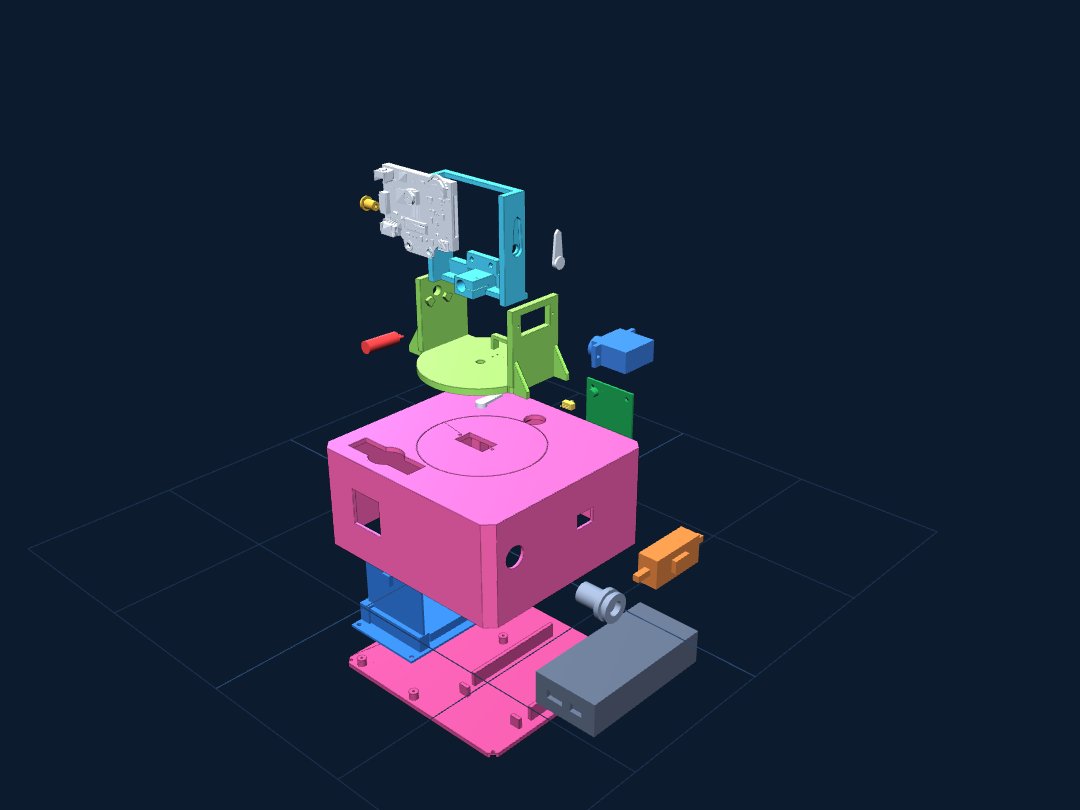
Fill the base
Batches 3 and 4 done · about 1 hour
The base is the turret's body. It holds the brain, the power bank, the speaker, the arm switch, and the pan servo. It stays open underneath until Step 9.
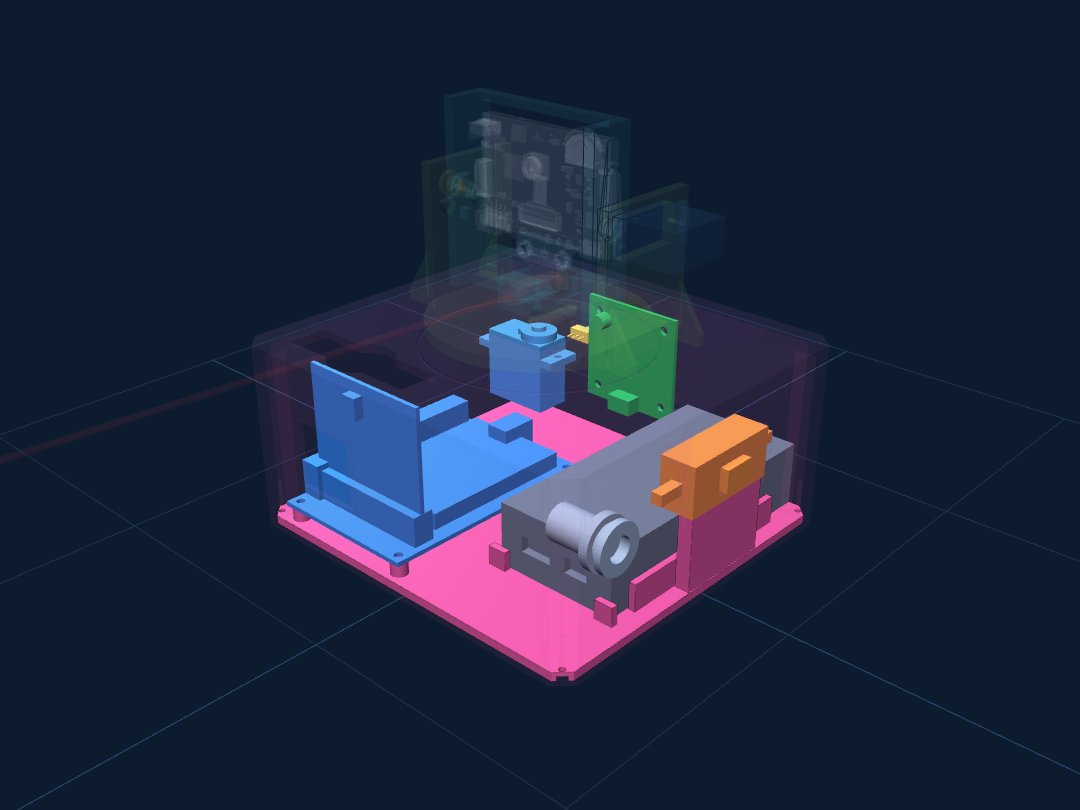
Board and micro:bit front left, power bank right, speaker on the back wall just left of center, pan servo under the deck.
- Screw the Xia mi board onto the four posts on the floor plate, micro:bit end toward the front. 4 × M2.
- Stand the turret micro:bit in the board's socket. Its lights will show through the front window.
- Screw the speaker to the four bosses on the back wall, just left of center, speaker facing the grille. 4 × M2.Set the volume knob to the middle first. It is hard to reach later.
- Press the arm switch into its frame on the back wall so the lever pokes out of the slot. A grown-up tacks it with hot glue.
- Push the pan servo up through the pocket in the deck from underneath until its ears sit between the two ribs, shaft on top near the middle.
- Screw it down from the top through the deck and the ears, with a nut underneath. 2 × M2 + nuts.
You are done when
The speaker, arm switch, and pan servo are solid in the shell, and the board is screwed to the floor plate.
Center the servos first
15 minutes · before any horn goes on
A servo can only turn 180 degrees. If the horn goes on while the servo is at one end, the head can only turn one way. So both servos go to the middle, 90 degrees, before anything is attached to them.
- Plug the pan servo into P1 and the tilt servo into P2, brown wire toward G.
- Plug the charged power bank into the DC jack (adapter, barrel cable, and in-line switch, like in Step 1) and load the centering program.
- Turn the in-line switch on. Both servos twitch to the middle and stay there.
- Switch off, and leave them alone until they get their horns in Step 8.
Program 3: center
Start a new project called turret.
How does a servo know what angle to go to?
The micro:bit sends the servo a short pulse about 50 times a second. The length of each pulse is the message: a short pulse means one end, a long pulse means the other end, and in between means in between. A tiny sensor inside the servo checks where the shaft is and keeps turning until it matches. That checking is a feedback loop.
Build the pan and tilt head
About 1.5 hours · a stubby screwdriver helps
The moving part. The turntable spins left and right on the pan servo. The yoke on top holds the head, which tips up and down on the tilt servo on one side and a printed pin on the other.
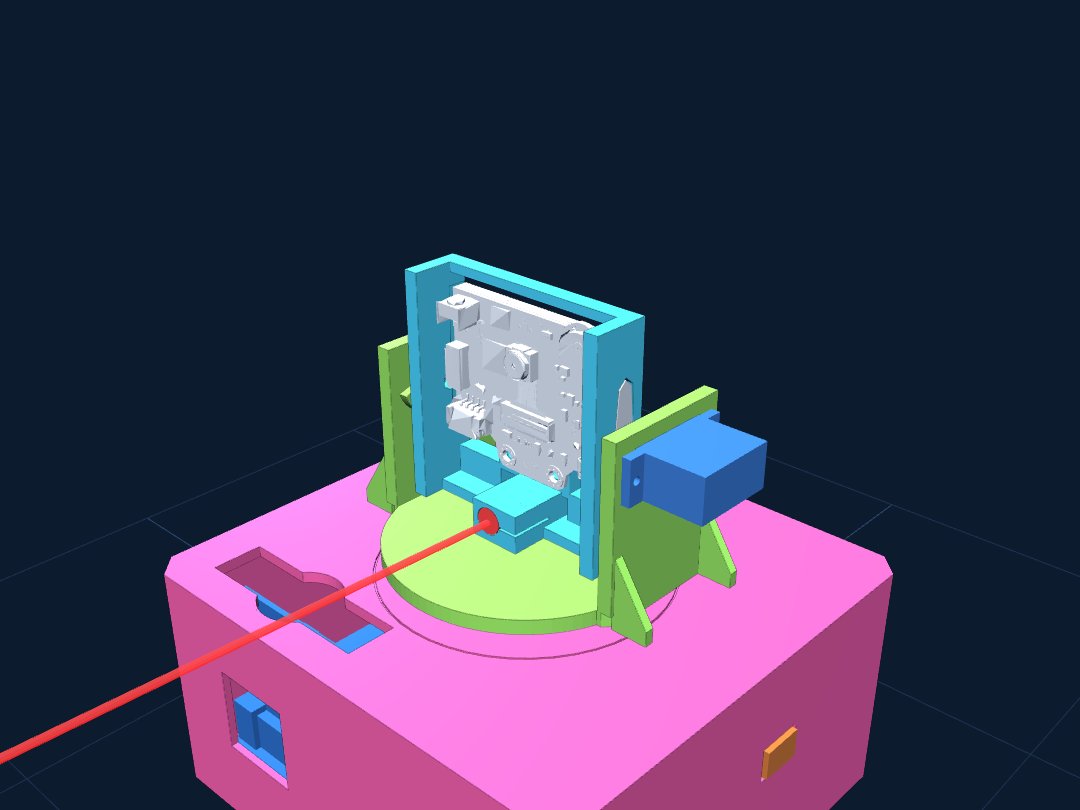
The finished head
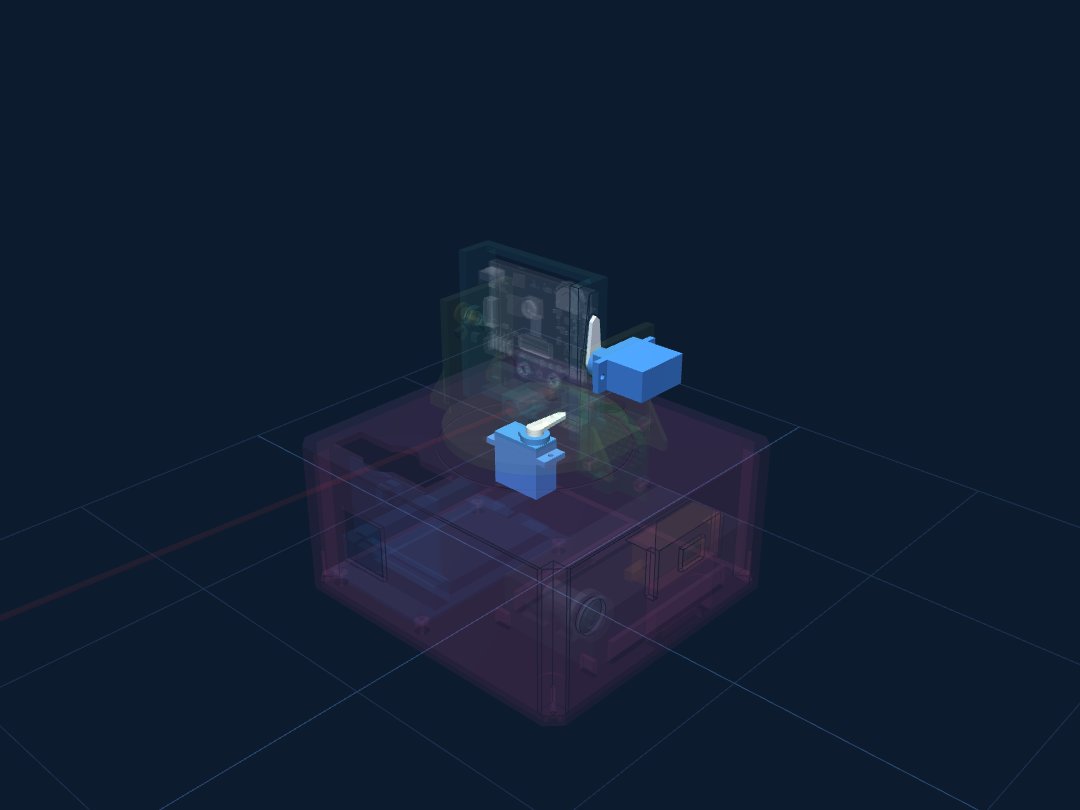
The two servos highlighted
- Press a servo horn into the pocket under the turntable.
- Set the turntable on the pan servo with the yoke's open side facing the front, and push it down onto the shaft. Drive the horn screw through the center hole.
- Screw the tilt servo to the right upright from the outside, shaft pointing in. 2 × M2.
- Press the other horn into the pocket on the head's right side, arm pointing up.
- Set the head between the uprights so the horn lands on the tilt shaft, head facing forward and level. Drive the horn screw from inside the head.
- Slide the pivot pin through the left upright into the head. Drop an M2 nut in the trap inside, then drive the M2 × 12 screw through the pin. The pin should turn freely in the upright.
- Slide the laser into its clamp under the camera spot, lens at the front, label showing, wires out the back. Snug the M2 × 10 screw from below. Snug, not tight.
- Bolt the HuskyLens on last: its tab against the plate, lens forward, screen facing back. 2 × M3 with the nuts in the back traps.
- Route the cables (camera, tilt servo, laser) through the arch at the back of the yoke and down the round hole in the deck.
Pan and tilt, and why the head has a stop
Pan is turning left and right, like shaking your head no. Tilt is tipping up and down, like nodding yes. With both, the head can point anywhere in front of it. Security cameras and movie cameras use the same idea.
A printed finger on the left side hits a block if the head tips more than about 40 degrees up or 35 down. Even if the code goes wrong, the laser physically cannot point up at a face. A safety that does not depend on code is called a hard stop.
You are done when
Power on with Program 3: the head faces straight ahead and level. Nothing rubs when you gently turn the turntable.
Wire the turret and close it up
About 1 hour · grown-up for the laser
Follow the turret wiring map. The laser gets two switches in a row: the arm switch a person controls, and the relay the code controls. Both must be on for any light.
- Camera cable into the HuskyLens port.
- Speaker into P0, pan servo into P1, tilt servo into P2. Brown or black wires toward G.
- grown-up Laser power: a wire from a 5V pin to the arm switch's middle leg; from one side leg to the relay's COM terminal; from the relay's NO terminal to the laser's plus wire. Laser minus wire to a G pin.
- Arm switch OFF. Tape a label next to it: ARM.
- Set the power bank in its cradle on the right half of the floor plate, ports facing the front. Pull the hook-and-loop strap over it through the two floor slots.Changed Sep 16 by change order MOC-004: the 4×AA pack and its side bay are gone. A rechargeable power bank stays inside instead.
- Plug the 90° adapter into the bank's USB-A port, and the barrel cable into the adapter. Coil the extra cable.
- Plug the barrel cable into the in-line switch, and the switch into the Xia mi DC jack. Leave the Xia mi's own little power switch ON.
- Press the switch rocker into its window in the right wall so it pokes out, under the sloped keeper. This is the main on/off switch now. Hold it there until the floor plate is on: the plate has a small wall the switch sits on.
- Charge port: push it through the round hole near the front of the right wall from the outside, screw its nut on from the inside, and plug its cable into the bank's USB-C port.
- Screw the floor plate on from underneath. 4 × M2.
- Load the relay test and listen.
Program 4: relay test
Add the xia_mi extension first: Extensions, then paste github.com/DFRobot/pxt-DFRobot_xia_mi_Board. Pick V1 or V2 to match the number you found on the board in Step 1.
What is a relay?
A relay is a switch flipped by a tiny electromagnet instead of a finger. The micro:bit sends a small signal, the magnet pulls a metal arm, and a separate circuit closes. You can hear it: click. That click is the moment the laser fires.
NO means normally open: no connection until the relay clicks. COM is the common terminal that gets connected.
You are done when
The relay clicks every 2.5 seconds. With the arm switch off, no dot. With it on, a red dot blinks on the backdrop. Arm switch back off.
Part D
Teach it and code it
The turret learns the mosquito, follows it, and fires when it is centered. Then the laser gets lined up.
Teach the camera the mosquito
About 30 minutes
This is machine learning, done with one button. The camera studies the mosquito from lots of angles and builds its own idea of what a mosquito looks like.
- Hang the mosquito in front of the black backdrop and switch the turret on.
- Check the camera's settings: in General Settings, Protocol Type should be I2C or Auto.
- Turn the dial on top until the screen says Object Tracking.
- Point the camera so the mosquito sits inside the frame in the middle of the screen.
- Press and hold the learn button. While holding it, slowly move the mosquito closer, farther, and turn it a little. Let go.
- A box labeled ID1 now follows the mosquito. Swing it around and watch.
What is machine learning?
Normal code is a list of rules someone writes. Nobody can write rules for "what a mosquito looks like." So instead, the camera looks at many examples and finds the pattern itself. That is machine learning.
A camera picture is made of tiny dots called pixels. The camera tells the micro:bit where the middle of the box is, as two numbers: x (across) and y (down). Those are coordinates.
You are done when
The ID1 box stays on the mosquito while it swings, and does not jump to other things in the room.
Code the turret: follow the mosquito
About 1.5 hours
The turret looks where the mosquito is, turns a little toward it, and looks again, many times a second. No firing yet.
- In the turret project, add the HuskyLens extension (Extensions, search huskylens).
- Build Program 5 below and download it.
- Swing the mosquito slowly. The head should chase it.
- If the head turns away from the mosquito, change that line's minus to plus (or plus to minus).
- Find the tilt limits: tip the mosquito high and low and watch where the head stops before it touches its hard stop. Put those angles in the tilt constrain block.Keep a few degrees of room so the servo never pushes against the stop.
- If the head shakes back and forth, change both 20s to 30. If it is too slow, try 15.
Program 5: follow
Variables to make first: pan, tilt, x, y.
Why divide by 20?
If the mosquito is 40 pixels to the right, 40 ÷ 20 = 2 degrees of turn. If it is 100 pixels away, the turn is 5 degrees. Big miss, big turn. Small miss, small turn. This is called proportional control, and it is how cruise control, thermostats, and drones steady themselves.
Divide by a small number and the turret over-shoots and wobbles. Divide by a big number and it is smooth but slow. Finding the best number is tuning. Write down each number you try and what happened.
You are done when
The head follows a 10 degree swing smoothly and keeps the ID1 box near the middle of the screen.
Journal: every divide number you tried, and the tilt limits you picked.
Lock on, fire, and make the sounds
About 2 hours · arm switch OFF while coding
Now the turret fires when the mosquito is in the lock-on box, listens to the wand by radio, and gets its sound effects.
- Design the sounds in MakeCode. Drag in a "play sound" block and click the picture to open the sound editor.Pew: a square wave sliding from high to low in a quarter second. Boom: noise, very low, half a second. Splat (for the wand): noise, short, falling. Victory: the built-in melody Power Up.
- Add the new parts below to the turret program: the variables, the fire function, the lock-on check, and the radio messages.
- Put the splat sound in the wand's Program 2 too.
- For testing only, set hunting to true in on start. Step 15 hands that job to the wand.
- Arm switch off. Swing the mosquito. Each lock-on should beep, click the relay, and pew.
Program 6: lock on and fire (added to Program 5)
New variables: hunting, boom, score, lastShot.
Why wait a whole second between shots?
The camera sends a new picture many times a second. Without a wait, the turret would fire again and again at one lock-on, and one real hit would look like five. The cooldown makes every shot a separate try, so the data is fair. It also gives the eyes time to flash and the splat time to play.
What is sound, and how does the editor make a pew?
Sound is air shaking. How many times it shakes each second is its frequency, measured in hertz. A high shake is a high pitch. A pew is a high pitch that slides down fast. A boom is a very low, rough shake called noise.
You are done when
With the arm switch off, every lock-on beeps, clicks, and pews, no more than once a second. A flashlight flick on the pod makes the turret play Power Up.
Line up the laser
About 45 minutes · grown-up runs the arm switch
The laser sits 38 mm below the camera lens, aimed up a tiny bit (about 2.4 degrees) so the two lines cross 3 feet away, the test distance. Now check that the dot really lands on the white face.
Not to scale: the real angle is much flatter. From 2 to 4 feet the dot stays on the face.
- Hang the mosquito so the pod is at camera height, 3 feet from the lens, backdrop behind it.
- Wand on, turret on, hunting on (testing setup from Step 12).
- grown-up Arm switch on. Hold the mosquito still in the middle of the camera's view.
- Watch where the dot lands on each shot. Every shot should make the eyes flash.
- If the dot is off to one side, arm switch off, loosen the clamp screw, slide a thin strip of paper along one side of the laser to nudge it, tighten, and try again.
- Repeat at 2 feet (the fair table) and 4 feet. Arm switch off when you are done.
Why does the dot move with distance?
Two straight lines that are not side by side can only cross at one point. The camera and laser are 38 mm apart, so they cross at 3 feet and drift apart before and after. The white face is 40 mm tall, big enough to catch the dot from 2 to 4 feet. That is why every test runs at 3 feet, and why the fair table keeps the mosquito 2 to 3 feet from the camera.
You are done when
Ten shots out of ten make the eyes flash at 2, 3, and 4 feet, with the mosquito held still.
Journal: where the dot landed at each distance and anything you had to fix.
Part E
The test rig and the data
A backdrop, a pendulum that swings the mosquito the same way every time, and a wand that runs each test and saves the numbers by itself.
Set up the backdrop and pendulum
Batch 5 done · about 45 minutes
For experiments, nobody holds the mosquito. It hangs from a pivot and swings from a marked angle, so every run starts exactly the same way. That is what makes the test fair.
Pull the mosquito to the angle mark, let go, and it swings side to side in front of the turret.
- Stand the foam board in the two printed feet, one near each end.
- Push the clip onto the middle of the top edge, and slide the dowel through it so it sticks straight out toward the turret.
- Clamp the pendulum pivot near the end of the dowel, angle marks facing the turret.
- Loop the fishing line over the peg and adjust it until the white pod hangs at camera height.
- Set the wand beside the pivot on the dowel, with the ribbon running down the line.
- Tape a tape measure to the table from the line toward the turret. Mark 3 feet (every test run) and 2 feet (the fair table). Put a strip of tape where the turret's front edge goes for each.
- Learn the marks: one hole next to a notch is 10 degrees, two holes 20, three holes 30.
- Cut three target covers from black paper, each just bigger than the pod face, with a round hole in the middle: 40 mm, 20 mm, and 10 mm. Tape the 40 mm one on for the speed test.Same outside size on all three, so the camera sees the same mosquito and only the target changes.
Why does a bigger angle make a faster mosquito?
Pulling the mosquito back to a higher angle lifts it higher, which gives it more energy. At the bottom of the swing, that energy turns into speed. About twice the angle gives about twice the speed.
Here is the surprise: for small swings, the time for one swing hardly changes. Only the speed does. Galileo noticed this more than 400 years ago watching a lamp swing in a church.
You are done when
The mosquito swings smoothly from each mark, the pod passes through camera height, and the 3 foot mark is on the table.
Code the wand: the run recorder
About 1.5 hours
The wand becomes the boss of every run. It picks the test, starts the turret, times 30 seconds, counts hits, and saves one row of data that stays even when the batteries come out.
- In the wand project, add the datalogger extension (Extensions, search datalogger).
- Build Program 7. It replaces Program 2, but keeps its hit detector.
- In the turret program, set hunting back to false in on start. Now the turret only fires during a run.
- Download both. Press A a few times, then B, then A and B together. The turret should start hunting, and stop after 30 seconds.
Program 7: run recorder (wand)
Variables: names, pick, run, running, start, hits, first, light, threshold, boom.
When the wand is not in a run, a hit still flashes the eyes and splats. That is the hand-held demo mode.
What is data logging?
Logging means writing down a measurement every time something happens, automatically. The micro:bit V2 saves each row in its own memory, which keeps it even with the batteries out.
Plug the wand into a computer and open the file called MY_DATA on the MICROBIT drive. It shows a table, a graph, and a button to download the numbers for a spreadsheet.
You are done when
A+B starts the turret, it stops by itself after 30 seconds, and a new row appears in MY_DATA.
The first full test
About 1 hour · then practice until Dec 11
A dress rehearsal. Five practice runs, just like a real experiment, to find anything silly before the numbers count.
- Charged power bank in the turret, fresh batteries in the wand. Turret on the 5 foot mark, room lights on.
- Teach the camera the mosquito if it has forgotten.
- On the wand: A until it says speed 10, B to run 1.
- grown-up Arm switch on. Pull the mosquito to the 10 degree mark.
- Let go, then press A+B. Hands off. Wait for the beep.
- Write the hits on the paper data sheet. Press B for the next run. Do five.
- Arm switch off. Plug in the wand, open MY_DATA, and check the five rows match the paper.
- Take a photo of the setup for the board.
Why practice runs do not count
Practice is for finding problems: a loose wire, a camera that forgot, a threshold that is too tight. Fix them now. Once the real tests start on December 12, every run counts, even the bad ones, and you only redo a run if something broke.
You are done when
Five runs are saved, the file matches the paper, and nothing broke. The MS-2000 is built. Next: the hypothesis is due December 9, and the experiments start December 12.
Journal: the five practice numbers, what went wrong, and how you fixed it.
When it misbehaves
Fixing it
Find what you see, try the fix. Write down every problem in the journal; judges like hearing how you solved them.
| What you see | Most likely cause | What to do |
|---|---|---|
| Nothing happens at all | Power | Side switch on? Bank charged? Xia mi power switch on? Adapter pushed all the way in? |
| micro:bit will not take the code | Cable | Many micro-USB cables only charge. Use one you know moves data. |
| Camera screen works, turret does not move | No data from the camera | Check the camera cable is in the HuskyLens port and Protocol Type is I2C or Auto. Is ID1 learned? |
| Head turns away from the mosquito | Sign is backwards | Swap minus and plus in that servo's line in Program 5. |
| Head shakes back and forth | Turning too much each time | Divide by a bigger number: 30 instead of 20. |
| Head chases other things | Camera learned the room | Forget and re-learn in front of the black backdrop. Clear the table behind the mosquito. |
| Servo buzzes at one end | Pushing against a stop | Tighten the constrain numbers by a few degrees. |
| Relay does not click | Wrong board version | Change V2 to V1 in the relay blocks, or the other way. |
| Relay clicks, no laser | Arm switch off, or a wire | Grown-up checks: arm switch on, 5V to the switch, COM and NO on the right terminals, laser minus to G. |
| Laser hits, eyes do not flash | Threshold too high | Change + 100 to + 60. Check the dot is on the white face. |
| Eyes flash with no laser | Threshold too low, or room changed | Start a new run (A+B) so the wand measures the room again. Try + 150. |
| Eyes never light | LED in backwards | Long leg must go to the resistor side. Grown-up re-solders. |
| Turret never hears the wand | Radio group | Both programs must say radio set group 7. Keep them within a few meters. |
| One hit counts twice | Missing the wait loop | Check the "while ... pause 20" loop is in the wand's forever. |
| A screw spins and will not tighten | Stripped plastic | Use the next longer screw, or a grown-up adds a drop of glue and waits. |
| Hits drop during a test day | Not the power | The bank holds a steady 5 V, so this should not come from power. If the bank runs empty, the turret stops all at once. Charge it before each test day. |
Words to know
Say these like a scientist
Judges ask what words mean. Here they are in one place.
Everything else